Sunday, February 28, 2016

A Humble Story Lives On

Hettie Stein never dreamed hundreds or thousands of people would learn about her life when she hand-wrote her lifestory on forty pages of notebook paper sometime around 1975. She wrote separate, personalized copies for each of her three grandchildren, my husband being one. We have not seen either of the other two copies, but I scanned in ours, saving the images in a PDF file and also transcribing them into a Word document for easier reading by later generations.

Now the world can read about Hettie’s life on Amy Cohen’s blog, Brotmanblog: A Family Journey, beginning with Part 1 and share our delight in these accounts of a long-gone way of life in simpler times.I thank distant cousin Amy for finding our family and pulling so many resources together into a compelling story.

As you can see from the graphic below, excerpted from Hettie’s story (which I gratefully borrowed back from Amy’s blog), the writing is as primitive as a Grandma Moses canvas in both form and message. As Hettie explains in her story, she chose to leave school after eighth grade (in 1898). Her reasoning was that like other women of her day, her lot in life was to marry and raise a family, and no housewife needed more book learning than she already had, so why exert herself?


This lack of formal education shows in her writing, but that did not deter her for a moment. Thank goodness! This humble, unaffected story reflects her authentic heart, big as all outdoors, and the fact that she wrote it is the sign of a satisfying life. She never had material wealth, but what she had was enough. I have never met a kinder, more positive person. Hettie loved everyone with childlike enthusiasm, and was always up for an adventure. I feel blessed for having been part of her family.

Hettie decided one day to write these stories. She just sat down and did it, though it took her months to finish each one. She wrote each story in the form of a letter to that grandchild, warmly laced with references to memories of “your mother” and “the time you and I …”. We have not seen the volumes she wrote for her two granddaughters, but presumably they cover much of the same material, customized with slightly different words.

She wrote for my husband. She died in 1987, more than a decade before I preserved her work for the family and the world. Now it’s treasured by great- and great-great-grandchildren and will hopefully be passed down even further.

I often mention her amazing accomplishment when I’m encouraging people to write. “If Hettie could do that, anyone can. You don’t need to produce a literary masterpiece. Whatever you write is better than nothing and will be treasured by generations to come.”

Hettie wrote by hand, on the simple paper she had. She made a manila paper folder to hold the pages and fastened it all together with brads. Even without those manila covers, in only a few years, the acidic notebook paper had begun yellowing. Scanning put a halt to that process.

If by some amazing coincidence, you decide to write a legacy manuscript by hand, acid-free paper is easy to find today. More likely you’ll sit down at a keyboard and print acid-free copies. But even if you write on unfolded paper bags or the backs of envelopes, your descendants will treasure your work.

Points to ponder: If you’re trying to get traction, what obstacles prevent you from “just doing it”? Are you concerned that you writing won’t measure up and your family will laugh or sneer? How good is “good enough”? If you are well on your way toward finishing a story, ponder how satisfying that feels.

Monday, February 22, 2016

Continuous Creative Improvement


Creative people in any field share the goal of continuous skill development. Bear with me as I loop into photography to make a point about writing.

This photo of gulls perched on the southern shore of Lake Pukaki with Mt. Cook in the distance looks great to most people. It looked great to me when I took it in 2005 en route from Christchurch to Queenstown on New Zealand's South Island. It's got most of the elements of a great picture: item of interest in foreground, sweeping vistas afar, sharp focus, clear color, contrasting tones, life contrasting with barren expanse, level horizon.

When I look at this picture, I’m brought back to the moment of crystal-clear air, vast silence broken only by screeching gulls, whispering breeze, shoes on gravel, clicking shutters, and awed murmurs from tour group friends.

It looked good when I took it, and it serves the purpose of preserving and evoking memories. But something has always bothered me about this picture. It has never seemed quite right. It lacks a clear message. Which matters most, the birds or the mountain? I’ve learned quite a bit about photo composition since I snapped this shot. I now see how to frame it better. As much as I’d like to, I can’t loop back to New Zealand for a do-over today, so I’m faking it with Photoshop.


By virtually moving to my right a few feet, I  position that rock so its left slope and the lines of the gulls lead your eye up toward Mt. Cook. The rock echoes slope shapes, lending symmetry to the shot.

That's better, but I still don't feel finished.


Using magic again, I  kneel down, holding the camera at a lower angle, narrowing the gap between birds and slopes. My sense of the scene is wide. Cropping the image enhances that effect. Less is often more. I could keep playing with this shot, but for now I've made my point.

I sometimes open a file or pull out a paper with a story I wrote a dozen or twenty years ago. I read the story and recall the moment and realize I’ve learned better ways to tell it. My fingers twitch as I read, reaching for the keyboard. I may add detail, subtract focus blurring fluff, tighten wording or add dialogue. I turn simple narrative into sizzling scene.

Another lesson from photography comes into play here. Not only has my technique improved, technology keeps improving both cameras and editing tools. Photos I edited fifteen years ago may look garish and clumsy compared to what I’m able to do today. Even today I may over-edit, ending with gaudy results. Saving edits as a new file can save the day, allowing me to start over with the original material.

The same thing can happen with stories. More than once I’ve been called out for gaudy drama in stories. Starting fresh with that earlier draft calmed things down. Earlier drafts can help flesh out related stories, and reading them again reassures me that I am continously improving.

I continuously improve my photo skills by taking classes and hanging out with photographers who know more than I do. I study the work of experts and take thousands of pictures. I improve my writing skills by reading books and blogs about writing, by reading the work of acclaimed authors, by attending workshops and conferences, by reading voraciously, and by writing, over and over, until it works.

Would I take this photo right the first time if I did go back again? Maybe. If I had time I’d take it from many angles to increase the odds. And I often write stories several ways to find the one that suits me best.

Points to Ponder: Can you look back at early stories and see how your work has progressed? What steps do you take to ensure your writing continues to improve?

Wednesday, February 17, 2016

Rebooting My Blog

To everything there is a season,
A time for every purpose under heaven … 
Eccl. 4:1

The past few months have been my season to pack, unpack, explore, and settle into my new Texas home. Beyond email and sporadic journal entries, they have not been a time to write. That’s okay. Boxes are unpacked, guestroom warmed, new dining table christened, and I’m once more thinking beyond shopping for rugs and bedspreads.

For several weeks I hardly thought about writing at all. Then thoughts of writing bubbled up. I began gently pondering what I really want to write and how to best go about it. I’ve finally realized that I do enjoy sharing my thoughts about writing, online and in person. I’ve missed involvement with writing community. Now the write season is bursting forth. It’s time to reboot the blog and begin its eleventh year.

A metaphor just came to mind. Our ten knock-out rose bushes bloomed bravely through the entire Austin version of winter. Last week we pruned them, barely making the prescribed Valentine's Day deadline. Past blossoms are gone, and new growth gushes forth. Within weeks those bushes will be covered with  new blooms. My writing life has been pruned by the move. New growth is gushing forth — from the same roots and stems, snipped shorter for strength.

As I reboot, I’m pruning my process, returning to basics. I'm lopping off three Success Rules for Bloggers as mandated by highly paid experts.

1. You MUST blog at least once a week. Hogwash! How many of you readers schedule time on your calendar to read specific blog posts each (Tuesday) morning? If you’re like me, you read them when they appear in your inbox or feed reader, and you may skip right past them if you’re busy. I want to be a rare gem that gets your attention in the midst of that predictable mass.

2. You MUST reliably post on a predictable schedule. See above. I’ll post when I have something to say and time to say it. Although it’s unlikely, I might post four times in one week. It’s more likely I’ll post sporadically, a few times a month. I hope to delight you with inspiring posts, not bore you with content scrounged up to meet a deadline.

3. You MUST include graphics. Big, colorful, eye-catching graphics. For the past few years I’ve spent almost as much time searching for and creating these graphics as writing posts. That’s a discouraging drag, not how I want to spend my time. If a graphic serves a purpose, I’ll add one. Beyond that, well, I’m not writing children’s books.

My decisions are purpose driven: I write and blog to share insights, encourage and inspire other writers, especially beginners, and create community, not to “build a business.” I’m past the season in life where building and running a business is a priority, desire or interest. Since profit is not part of my purpose (though I’m not above welcoming some), cumbersome business building mandates induce creativity stifling guilt, self-doubt and procrastination. They are counter-productive for me. If some find this approach "unprofessional," so be it. I hear my drummer and it's time to march!

I shall find my best path, blaze a new trail, and whatever results is enough!

Stay tuned. This post covers rebooting my blog. I’ll have more to say soon about rebooting story flow.

Points to Ponder:  What aspects of your writing are you doing because “you should”? What doesn’t fit? How can you change that? Do you need a time out? 

Tuesday, February 9, 2016

Eye Candy

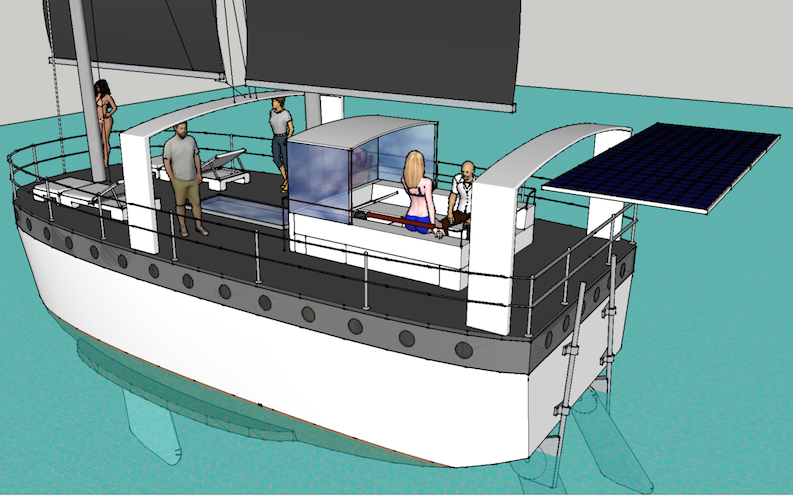
Many thanks to Helder Silva of Lisbon for making these 3D models in Sketchup.

Life on board is much too hard!
Full pilot house in the front, dodger version in the back


View from starboard quarter

Centerboards down

Meanwhile, down below

Centerboard pivot

Starboard water tank


Monday, January 25, 2016

QUIDNON Assembly: Stuff and Glue

When building a boat, no matter what technique is used, most of the time goes into making the parts. Much of the quality of the resulting hull has to do with the quality of the pieces—the precision with which they are fitted together. Much time is squandered grinding and trimming them to achieve a tight fit. All of this work requires some level of expertise, plus a well-equipped workshop.

This won't work for QUIDNON, which is to be assembled barn-raising style on some sheltered bit of coastline in a few summer weekends by people who have never built a boat before, and, if all goes well, never will build a boat again, boatbuilding being entirely incidental to the far more interesting activities of living aboard a boat and sailing it around.

Therefore, QUIDNON will arrive at the construction site in the form of a set of shipping pallets loaded with all of the parts pre-made. The kit of parts from which the hull is assembled will consist of a large set of plywood panels, milled out using an excessively precise numerically controlled machine. Each piece will be numbered, and each assembly step documented in a printed assembly manual.

The usual technique for assembling plywood-and-fiberglass hulls is to screw the plywood pieces to a light wooden frame using countersunk stainless steel screws while simultaneously gluing them in place with epoxy. After assembly, the joints are filleted using a bead of epoxy loaded with a special filleting compound. This is the so-called “screw and glue” method, and is known to result in a durable, long-lasting hull.

The choice of stainless steel is a compromise: stainless steel is not really stainless, and starts to rust as soon as it is deprived of oxygen. A layer of surface oxide called passivation is what gives it its stainless properties. It is unknown how well stainless steel fasteners fare when encapsulated inside a sealed wooden hull, where there is always the possibility that bacterial action will create an anoxic environment. Ideally, there would be enough osmosis happening, with water molecules migrating in from the outside and evaporating from the inside, and enough oxygen molecules would be carried along with the water to keep the stainless steel passivated. A safer choice would be to use bronze screws, but the cost of bronze is exorbitant.

Another, even better, and very cheap alternative is to use no metal fasteners at all. Instead, the plywood pieces are fitted together using a system of tabs and slots, all of them precision-milled using an NC machine. In instances where there is the possibility of making a mistake in assembly by choosing the wrong part, the joints are keyed using a unique combination of tabs and slots, making it physically impossible to assemble the hull incorrectly. The pieces are assembled in a certain sequence, which is made obvious by the consecutive numbering of the parts. After assembly, the joints are saturated with epoxy, then filleted to fill any minor voids and to bring each joint up to its maximum strength.

Several types of joints will be used.
  1. The simplest is the box joint: the edges of two pieces are made with complementary tabs, which mesh together in a rectangular zigzag pattern. This joint is used to join the bottom with the sides of the hull, and the transom, as well as in a lot of interior carpentry.
  2. Similar to it is the tab-and-slot joint: instead of teeth, one of the two pieces is made with slots that the tabs fit into. This joint is used to join the deck with the sheer clamp (the strip that goes all around the deck and is variously known as rail, or rubrail, or inwale, or gunwale, or bulwarks). In the case of QUIDNON, the sheer clamp has quite a number of duties: below deck, it is perforated by a row of holes for the deadlights that admit light into the cabin, covered on the outside by a strip of polycarbonate plastic; above deck, it holds scuppers that drain the deck and admit dock lines.
  3. Next is the zipper joint, which makes two pieces that are within the same plane act as one, by providing good strength under both tension and compression. This joint is used to join the sheer clamp to the sides, and to assemble the deck, the sides, the bottom and the transom out of separate panels.
  4. Next, it is sometimes necessary to have some tabs slide inside slots. Certain pieces of cabinetry need to be pre-assembled before being slotted into one panel while sliding in slots in another. Unmodified, this technique leaves voids, because the slots are longer than the tabs, and voids are a problem: they are hard to fully saturate with epoxy, can fill with water, get infested with mold and start rot. Such a sliding joint is also weaker than the others: if the joint fails and slips, then this can compromise the integrity of several other joints. The solution is to introduce a third piece, which locks the slip joint, filling the void and making it impossible for it to slip back.
  5. The last kind of joint is quite trivial. It is simply a shallow trough, used to position the piece that is joined to it at a right angle. It avoids positioning errors while making the joint stronger, because even a shallow trough (a single plywood veneer's worth) is enough to give the joint plenty of strength once it is saturated with epoxy and filleted.

The assembly process

The assembly team is best organized as two sub-teams: the stuffers and the gluers. These roles don't need to be gender-specific, although I suspect that in a lot of circumstances the stuffers will be mostly boys and the gluers will be mostly girls. The stuffers have to have good upper-body strength and some spatial reasoning abilities. The gluers need fine motor control and tidy habits. For the stuffers, all that matters is speed of assembly, since mistakes are made virtually impossible by the keying on all the joints. For gluers, the strength of the joints and the longevity of the hull critically depends on their attention to detail: all the joints have to be fully saturated, there should be no accidental drips of epoxy anywhere, and the fillets have to have the correct size and shape.

The construction then proceeds as follows. Most of the hull assembly happens with the hull upside-down.

• A stage is erected at a spot that is within 20 feet of the water at high tide, using straight dimensioned lumber and leveled using a laser pointer and wedges.
• The bottom, the sides, the transom, the bulkheads, the internal partitions and pieces of the engine well are assembled using zipper joints and set aside.
• The deck is laid down upside-down on top of the stage and assembled using zipper joints.
• Frames, of which there only two—one at each mast—are assembled next, and through-bolted to the underside of the deck.
• Internal bulkheads and partitions, and the engine well, are installed onto the underside of the deck
• Small brackets called knees are joined to the underside of the deck, going all the way around. The knees sit in shallow slots in the deck to make them easy to position.
• The first layer of sheer clamp is assembled by fitting it onto the tabs in the knees and pulling the joints together using straps.
• The second layer of sheer clamp is screwed and glued onto the first. The bottom edge of this layer (facing up during assembly) holds a zipper joint that joins with the upper edge of the sides and the transom.
• The sides and the transom are assembled next, pushed onto the zipper joints and clamped in place (this is where the stuffers get a good work-out). The sides and the transom mesh together using a box joint.
• The bottom is fitted on, joining the sides and the transom using a box joint. It is horsed on using tensioned straps.
• The joints between the sheer clamp and the sides and between the sides, the bottom and the transom are all saturated with epoxy all at the same time.
• The third layer of sheer clamp is screwed and glued in place.
• Tabs that stick out where the sides, the bottom and the transom meet, and around centerboard trunks, are removed using any number of techniques: a hand plane for the handy, a belt-sander for the well-equipped or a grinder for the those who like tools that have hundreds of uses.
• The centerboard trunks are pre-assembled, passed through apertures in the staging and the deck, propped into place and glued.
• Additional layers of plywood are screwed and glued onto the sides, the bottom and the transom to bring them up to full thickness.
• The bottom, the sides and the sheer clamp are fiberglassed using a layer of mat and 3 layers of cloth.
• The sides and the transom are faired using a lightweight fairing compound and sanded flat.
• Pre-cut copper sheets are screwed onto the bottom and parts of the sides below the waterline.
• The centerboards and the rudder blades are assembled, and the centerboards are installed
• The hull is flipped over. This is done by assembling a trapezoidal cage out of timbers, knocking out one side of the staging, and using a winch to roll the hull onto the cage, and then knocking out the sides and the top of the cage, leaving the hull sitting on just the bottom supports
• All the joints are filleted on the inside of the hull.
• The superstructure—two instrument arches and the dodger or pilothouse—is assembled.
• The deck is fiberglassed, then finished using pre-cut sheets of aluminum diamond plate, which are bedded with caulk and screwed into place.
• The hull is sealed with epoxy inside and painted inside and out.
• Polycarbonate plastic panels are screwed onto the outside of the sheer clamp
• Cleats, bow rollers and rudder post brackets are installed.
• The stage is reassembled as a slipway reaching under the hull. Four casters are inserted into holes in the chine runners, which rest in a slot in the slipway.
• The rudders, the rudder blades and the tiller are assembled.
• The boat is loaded with all of the remaining parts and supplies.
• The engine bracket is installed in the engine well, the engine is lowered onto it, and the fuel tank, battery bank and engine controls are installed.
• A line is secured to the boat, the bottom of the cage on which the hull rests is knocked out, and the boat rolls into the water.
• The crew climbs aboard, starts the engine and motors away from the construction site.

The remaining tasks—installing the concrete ballast and the mast tabernacles, the masts, the stanchions and the lifelines, rigging, plumbing, wiring, berths, cabinetry, galley appliances, etc.—can be completed with the boat in the water. While this is most easily done with the boat docked, but it's quite possible to do the work even at anchor, especially in a spot where it's possible to walk ashore except at high tide. It can remain in the water uninterruptedly for the next 30-35 years: the copper-clad bottom never needs painting, and there are no underwater through-hulls, propellers or other nuisance components to service.

Monday, January 18, 2016

Sailing through a Meltwater Pulse

It's January, and the Greenland ice sheet is melting. There was recently a winter hurricane in the North Atlantic, and another in the Pacific. On New Year's day there was a thaw at the North Pole. Greenand is melting; when it melts, the ocean level will go up 20 feet (6m). This will be enough to flood all the coastal cities—permanently. So far, predictions as to how fast this melting will occur have proven to be worthless, with the actual melting rate outpacing them by a huge margin. And although many people still believe that the effect will be gradual—less than an inch a year—another view on the matter is that at some point there will be an avalanche-like collapse of the Greenalnd ice sheet, which will generate a meltwater pulse, sending ocean levels up many feet in a single step.

And there are all those who, whenever I publish something that mentions climate change, crawl out of the woodwork and gnash their exoskeletal mandibles at me, to the effect that climate=weather, and it's all a conspiracy theory. They are all idiots and deserve a boathook in the eye. Sailing on...

For the sake of this discussion, I will assume a meltwater pulse of 10 feet (3m). What will it mean for those of us who live on the water and sail along the coastline? And, more specifically, what will be the impacts for the sailboat design I have been working on for about a year now—QUIDNON, the houseboat that sails?

Ignoring, for the moment, other impacts, most shoreline marine facilities—marinas, boatyards, fuel docks—were constructed to be a few feet above the highest high tide. In many cases, they now have less than a foot of freeboard at highest high tide, and given a bit of a storm surge that number becomes negative, and the ramps that lead down to the floating docks stick up at a jaunty angle. A 10-foot rise will put virtually all of these facilities under a few feet of water at high tide, rendering them inoperable. With the transformers under water, they will be unable to provide electricity. Travelifts—the cranes that lift boats out of the water for maintenance—will be rendered inoperative, and so there will be no more haulouts.

But the worst part of it will be that entire marinas, which consist of an interconected structure of floating docks that float up and down on pilings with the tide, will lift off the pilings and drift off. The entire raft of docks and boats will drift until something runs aground. Then, when the tide ebbs, leaving the entire tangled mess high and dry, the powerboats will settle on their propellers, bending the drive shafts, while the sailboats—virtually all of them keelboats—will fall over, tangling their rigging together and becoming dismasted. A few tide cycles and a stiff blow later, and an entire marina's worth of boats will turn into an unsalvageable tangled pile of wreckage. For marinas in zones without much tidal range (a few spots on the Intracoastal Waterway in the US, all Bahamas) that use fixed docks instead of floating ones, the problem will be about the same: as the meltwater pulse arrives, the boats will individually lift off pilings and sail off in random directions in a tangled mass.

So much for marinas; but what of anchorages. After all, a few of us will have the foresight to get out of the marina and anchor somewhere. If you find an isolated anchorage in which to ride out the meltwater pulse, you might do fine, but in a crowded, shallow anchorage, where most boats have just a few feet under them at low tide, a 10-foot water level rise will cause them to run out of scope (the ratio between anchor chain length and depth). Anything less than 4:1 scope is unlikely to allow the anchor to hold a boat in place. They will drag anchor and end up littering the new coastline, which will run thorugh shopping mall parking lots, suburban subdivisions and historic waterfronts.

Most reasonable people would consider such a scenario, and conclude that when (note: not if but when) it happens, living aboard boats will become impossible, along with recreational boating if the boat is stored in the water. It might still be able to launch boats from trailers, at low tide, from the very top of some boat ramps. Kayaks, canoes, dinghies and rowboats could still be used. But without shore water, shore power, pumpout services for sewage, floating docks to tie up to and ramps leading to dry land, living aboard a boat will be almost impossible for most people.

Without functioning boatyards with travelifts it will no longer be able to maintain boats, which all need to have their bottoms painted and through-hulls maintained (that's a technical term for holes in the bottom of a boat, masking the fact that they are a bad idea). People who live aboard boats and drive to work will find it difficult to do so if the marina parking lot ends up under several feet of water twice in each 24-hour period.

But suppose you are an intrepid sort of sailor who doesn't mind living at anchor in the midst of a postapocalyptic landscape, fetching your water and fuel in jerricans by dinghy and pushcart from some place further inland? (I assume that the boat is a sailboat, because, with fuel docks underwater, there weren't be any reasonable way to keep a powerboat fueled.) What if you get around the lack of boatyard facilities by careening the boat? Well, then there are still some additional issues.

1. With all the jetsam and flotsam getting washed off what used to be dry land—cars, trucks, houses and so on—sailing around and anchoring will be rather difficult. When anchoring, it is useful to look at a chart, and see whether the holding ground in an anchorage is marked “sand” or “mud” or “hard.” But what if the spot where you want to drop the hook is full of mangled wreckage? Will the anchor hold, and will you be able to get it back out?

2. There are many fixed bridges which, in the US, along the Intracoastal Waterway, have 65 feet of vertical clearance. After a 10-foot meltwater pulse, that becomes a 55-foot clearance, which will not be enough for any sailboat over about 34 feet that can't drop its mast to pass under during high tide. And then there are all the bridges that open—bascule, swing and lift—and wouldn't it be nice if the bridge tenders left them with the bascules up, the swing span open and the lift span up before permanently abandoning their posts, but what are the chances? And so, depending on where along the coast you find yourself when the meltwater pulse arrives, and with no boatyard crane available to pull your mast, you may be stuck, with no way to make it out to deep water.

3. In addition to significantly higher ocean water levels due to the meltwater pulse, we are also likely to face many more hurricanes. Currently, there are three tactics for dealing with hurricanes on a boat: emergency haul-out (not possible with the travelifts not running and the boatyards flooded); finding a hurricane hole (good luck with that, now that they are all full of debris, making anchoring an uncertain business); and, for the ridiculously intrepid and annoyingly ultra-competent, taking off to sea (on this, see previous point).

But what if the boat you live on happens to be a QUIDNON?

  • QUIDNON is designed to run aground safely. It only draws a couple of feet, and its bottom is clad in roofing copper—a tough material that also resists marine growth, only requiring a periodic light scrubbing and brushing.
  • With its bottom flat, it settles upright and can safely dry out at low tide. If it drifts into a parking lot or a suburban subdivision, there it will remain until the water comes back, and then sail back into deeper water.
  • The lack of shoreline facilities don't affect it much: its bottom never needs to be painted because the copper cladding is designed to outlast the 30 years that is the design service life of a typical QUIDNON, and there are exactly zero underwater through-hulls to maintain, all of its water inlets and outlets consisting of siphon tubes that reach down into the engine well from above the waterline.
  • Lack of shore power is not a big problem for a QUIDNON, there being plenty of solar panels, a wind generator and room for a generator set on deck. There is even room for a high-temperature plastics burner, a biochar kiln, and a digester for biodegradable jetsam and flotsam.
  • Lack of access to fuel docks is not a big problem. QUIDNON's inboard-outboard, which lives in the engine well and can double as the dinghy motor, is used to maneuver and motor through calms, but most of the time it's possible to sail. QUIDNON is overcanvassed by most standards, and can move in the faintest zephyr. Thanks to the junk rig, it can even sail backwards, with the sails backed.
  • Lack of shore water is not a big problem, there being lots of area from which to collect rainwater, and huge tanks in which to store it over long dry spells.
  • The jetsam and flotsam clogging up the anchorages and the waterways may be problematic, but with just a 2-foot draft it should be possible to either see through or otherwise read the water to figure out what the bottom is. The plan can be to always dry out at dry tide, anchoring is a matter of finding a spot that has 3 feet above level ground at high tide, and putting down some stakes. The stakes are long steel pipes, with a pointed, conical plug at one end and a ring to tie a rope to on the other. Each of these goes through two holes, one through a fold-out hoop at deck-level, and one in the chine runners that protrude from the bottom on both sides. Once hammered in place, they effectively pin the boat in place, which then floats up and down when the tide picks it up.
  • If the need arises to pass under bridges that either don't open or are fixed and now too low, the solution is simple: drop the masts. On QUIDNON, this operation doesn't require a crane, and can be performed with the boat in the water, by just one person, using a come-along.
  • Lack of shoreside transportation with which to get to a job shouldn't be a problem either. With all this wreckage lying around, and many formerly prosperous coastal areas now unreachable by land and, for most people, by water either, there will be plenty of new opportunities in the salvage business.
  • If a hurricane hits, a QUIDON can be kept secure by running it aground at high tide and running lines out to pegs in multiple directions. No hurricane hole is needed; just a sheltered spot with a gently sloping shore.

In all, when the meltwater pulse arrives, it seems to me that, should you decide to stick around anywhere near the former coastline, your choices are 1. to get yourself a QUIDNON, or 2. abandon ship and flee to higher ground, and try to get by tied up alongside all the other miserable environmental refugees. I believe I have done my homework, and I think I know which choice I would prefer. Only two questions remain: Do I have enough money? and Do I have enough time? If you are interested in inhabiting the shoreline moving forward, please pitch in any way you can. Thank you.

Preserve a Record of Life As It Was

Believe it or not, this post is not about politics. It’s about change. Regardless of your political position or beliefs, you’d have to be l...